8 min read
Mulching Vegetables Without Smothering the Bed
Choose a mulch that fits the crop and the weather, then apply it in a way that lets the soil warm, breathe, and take up water.
On this page
In late spring, one vegetable bed may contain three kinds of ground. The transplanted tomatoes have stems thick enough to stand above a handful of straw. The carrots have just made green threads where the seed row used to be. At the edge, a few square feet are waiting for beans. Giving all three areas the same thick cover would make them look tidy and create three different problems. A mulch belongs to a planting stage as much as it belongs to a particular crop.
Start by identifying the job you need it to do. A surface cover can interrupt weed emergence, shade the soil, or keep water from splashing muddy soil onto low leaves and fruit. These benefits matter most once the crop is rooted and actively growing. The same cover can keep an early bed cool, offer shelter to slugs, or make a planting row hard to find. You do not need to cover every square inch on the day you open the bag.
Take care of the seed row first
A patch of bare earth warms earlier than a shaded patch in many cool spring conditions. For a heat loving crop such as peppers, wait until the soil is warm enough for active growth before applying a thick, pale organic mulch. If cool weather keeps returning, clear a wider space around the transplant for another week and use a hoe on small weeds. On a sunny, hot site, plants may benefit from earlier protection once the soil has warmed and the seedlings have enough height.
Mark rows of direct seeded crops with a pair of stakes. Leave a bare strip along the row and use a little mulch between established rows if you can keep it from blowing. Fine seeded carrots and lettuce need enough light and room to emerge. Do not place a mat of leaves or grass over the seed line. Once seedlings have true leaves and you can see which plants are staying after thinning, gently bring the mulch closer. A small hand rake or the edge of a board keeps loose material out of the row while you work.
Water deeply enough for the bed to be moist before you cover it. Avoid sealing a rain saturated bed under a wet mat of grass. Test the soil with your fingers or a trowel. In many soils, a handful taken just below the surface should feel cool and break up when you open your hand. Wet soil that smears onto your fingers needs time and air. The right time to add cover is often when you can work on the bed without leaving slick footprints along the edge.
Compare the materials already available to you
Clean straw is easy to spread around transplants. It has enough texture to let water pass through and enough body to shade the ground. Choose a bale from a source that can explain how the straw was grown and handled. Hay tends to bring more seeds with it. Straw can also contain some viable grain or weeds, so keep an eye on new sprouts and pull them while small. If you know the material came from a field treated with a persistent herbicide, ask a local extension service before using it near food crops.
Shredded leaves work well when you can break up the large pieces that would otherwise stick together after a rain. A little trapped air helps keep the layer loose. Whole leaves from several common trees can form a wet sheet that is hard for small seedlings to grow through. If shredding leaves with a mower, wait until they are reasonably dry, clear stones and litter first, and follow the mower instructions. Leaves that blew onto a busy roadside are poor candidates for use around produce.
Dry grass clippings are useful for a thin cover when you know the lawn has been kept free of herbicide applications unsuitable for mulch. Avoid collecting heavily seeded grass. Spread an initial light sprinkling and let it dry. A thick layer of wet, freshly cut grass can pack down and smell sour. If your first layer pulls up in one piece, break it apart and let the bed air out before adding anything more.
Use rough wood chips where they have a clear job. They make an excellent stable path between vegetable beds and can protect soil around many established perennials. In a bed where you sow small seeds every few weeks, a thick layer is harder to pull back and easier to mix into the planting zone by accident. Surface wood chips and wood mixed into soil behave differently. Keep woody material on top and out of a seed furrow. Where plants are changed often, straw or shredded leaves may be easier to move.
Place the cover around the plants you have
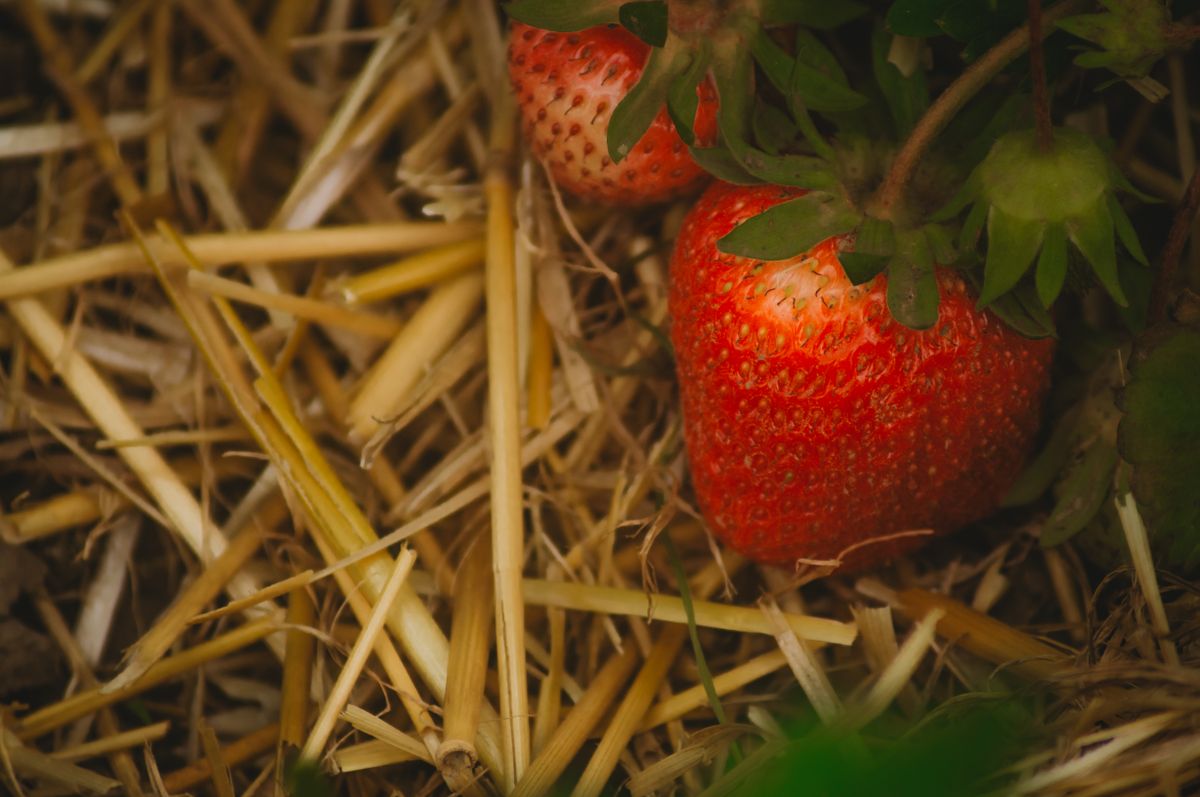
For an established summer vegetable such as a tomato, a few inches of loose straw can be a useful starting point. Apply it by hand and leave an open ring around the stem. Extend the ring if irrigation or humidity keeps the stem base wet. Use less around short plants and keep rosettes open. For strawberries, position the straw under leaves and fruit while leaving the crown visible. The crown is where leaves, runners, and roots meet, and wet material packed over it is an invitation for problems.
Leave room to harvest. You can run a loose band of mulch along the trellis line and keep stepping areas clear. Where two people pick tomatoes from opposite sides, leave access from each side. A layer wide enough to reach beyond the leaf canopy may save you a second round of work as the plants grow. If you use drip tubing, inspect it while the bed is bare and mark its location before covering it. A metal stake pushed through an invisible hose is an avoidable leak.
A mulch cover suppresses many weeds that emerge from seed. Pull established weeds before you lay it. Perennial weeds with living roots may work their way through the cover. Keep those roots out of the main bed where possible and check edges where grass can creep in from the path. It is easier to find escaped shoots when you look along the border in morning light. If you wait until the leaves of the crop and weed are tangled, you may pull the wrong thing.
Check water beneath the mulch
If you water by hand, lift a corner after an ordinary watering and look at the soil underneath. A storm or spray can wet the top of the straw while the root zone remains dry. A deep drink delivered more slowly is usually more useful than an extra surface sprinkle. If water rolls away to the paths, loosen any compacted mats and water in two passes with a pause between them. After irrigation, inspect a small patch a few inches into the soil where the crop has roots. Conditions directly under a dripper may look wetter than the rest of the row.
Mulch reduces evaporation from the soil surface. The plants still use water, and a dense canopy of tomatoes can go through more water in a hot spell than a bed of seedlings in cool weather. Check the soil and adjust your schedule as the plants grow. Set aside a small unmulched patch in an unplanted corner as a comparison if you want to see how fast each area dries. The difference can be easier to feel than to judge from color alone.
Plan the second sowing before you spread the first cover
A bed that grows both an early crop of radishes and a later crop of green beans can spend several weeks with part of the surface open. Give the established radishes enough room to harvest without catching straw in the leaves. Keep a loose pile of clean cover off the bed until the beans come up. You will be able to hoe the empty strip, sow into an even surface, and see where the new row needs water. Then bring the cover over from the harvested section in stages.
In an exceptionally hot week, a light cover can also reduce the amount of exposed soil between a succession of transplants. Transplant into a clear patch and water the root ball and surrounding soil. Reposition the mulch after the plants have settled into their new home. Check the soil the next day. Where one planting ends and the next begins, the edges are often where a small change saves the most work.
Make room for the things you find underneath
Slugs often hide in cool spaces close to the ground. If young plants start showing ragged holes and slime trails, inspect the bed with a light after dark. Move the mulch away from small transplants and remove dense hiding places nearby while you investigate. A plant old enough to tolerate some leaf loss can keep more soil cover than a seedling that has two leaves to spare. If you suspect rodents are sheltering in deep cover, thin it and remove piles of material that are close to the stems.
The right cover can change with the season. Pull material back where you need to sow a second crop. Reuse clean loose material on a path or around a later planting if the first bed needs to dry. If the mulch contains diseased foliage, weed seed heads, or an unknown chemical residue, seek local guidance before spreading it elsewhere. Cover the ground where there is a practical gain and keep the places you inspect, sow, or harvest easy to reach.
University of Minnesota Extension guidance on mulching
Back to top